Lights are the soul of a 3D scene. Master 5 light types and the three shadow elements to transform your scene from “flat” to a layered, realistic world.
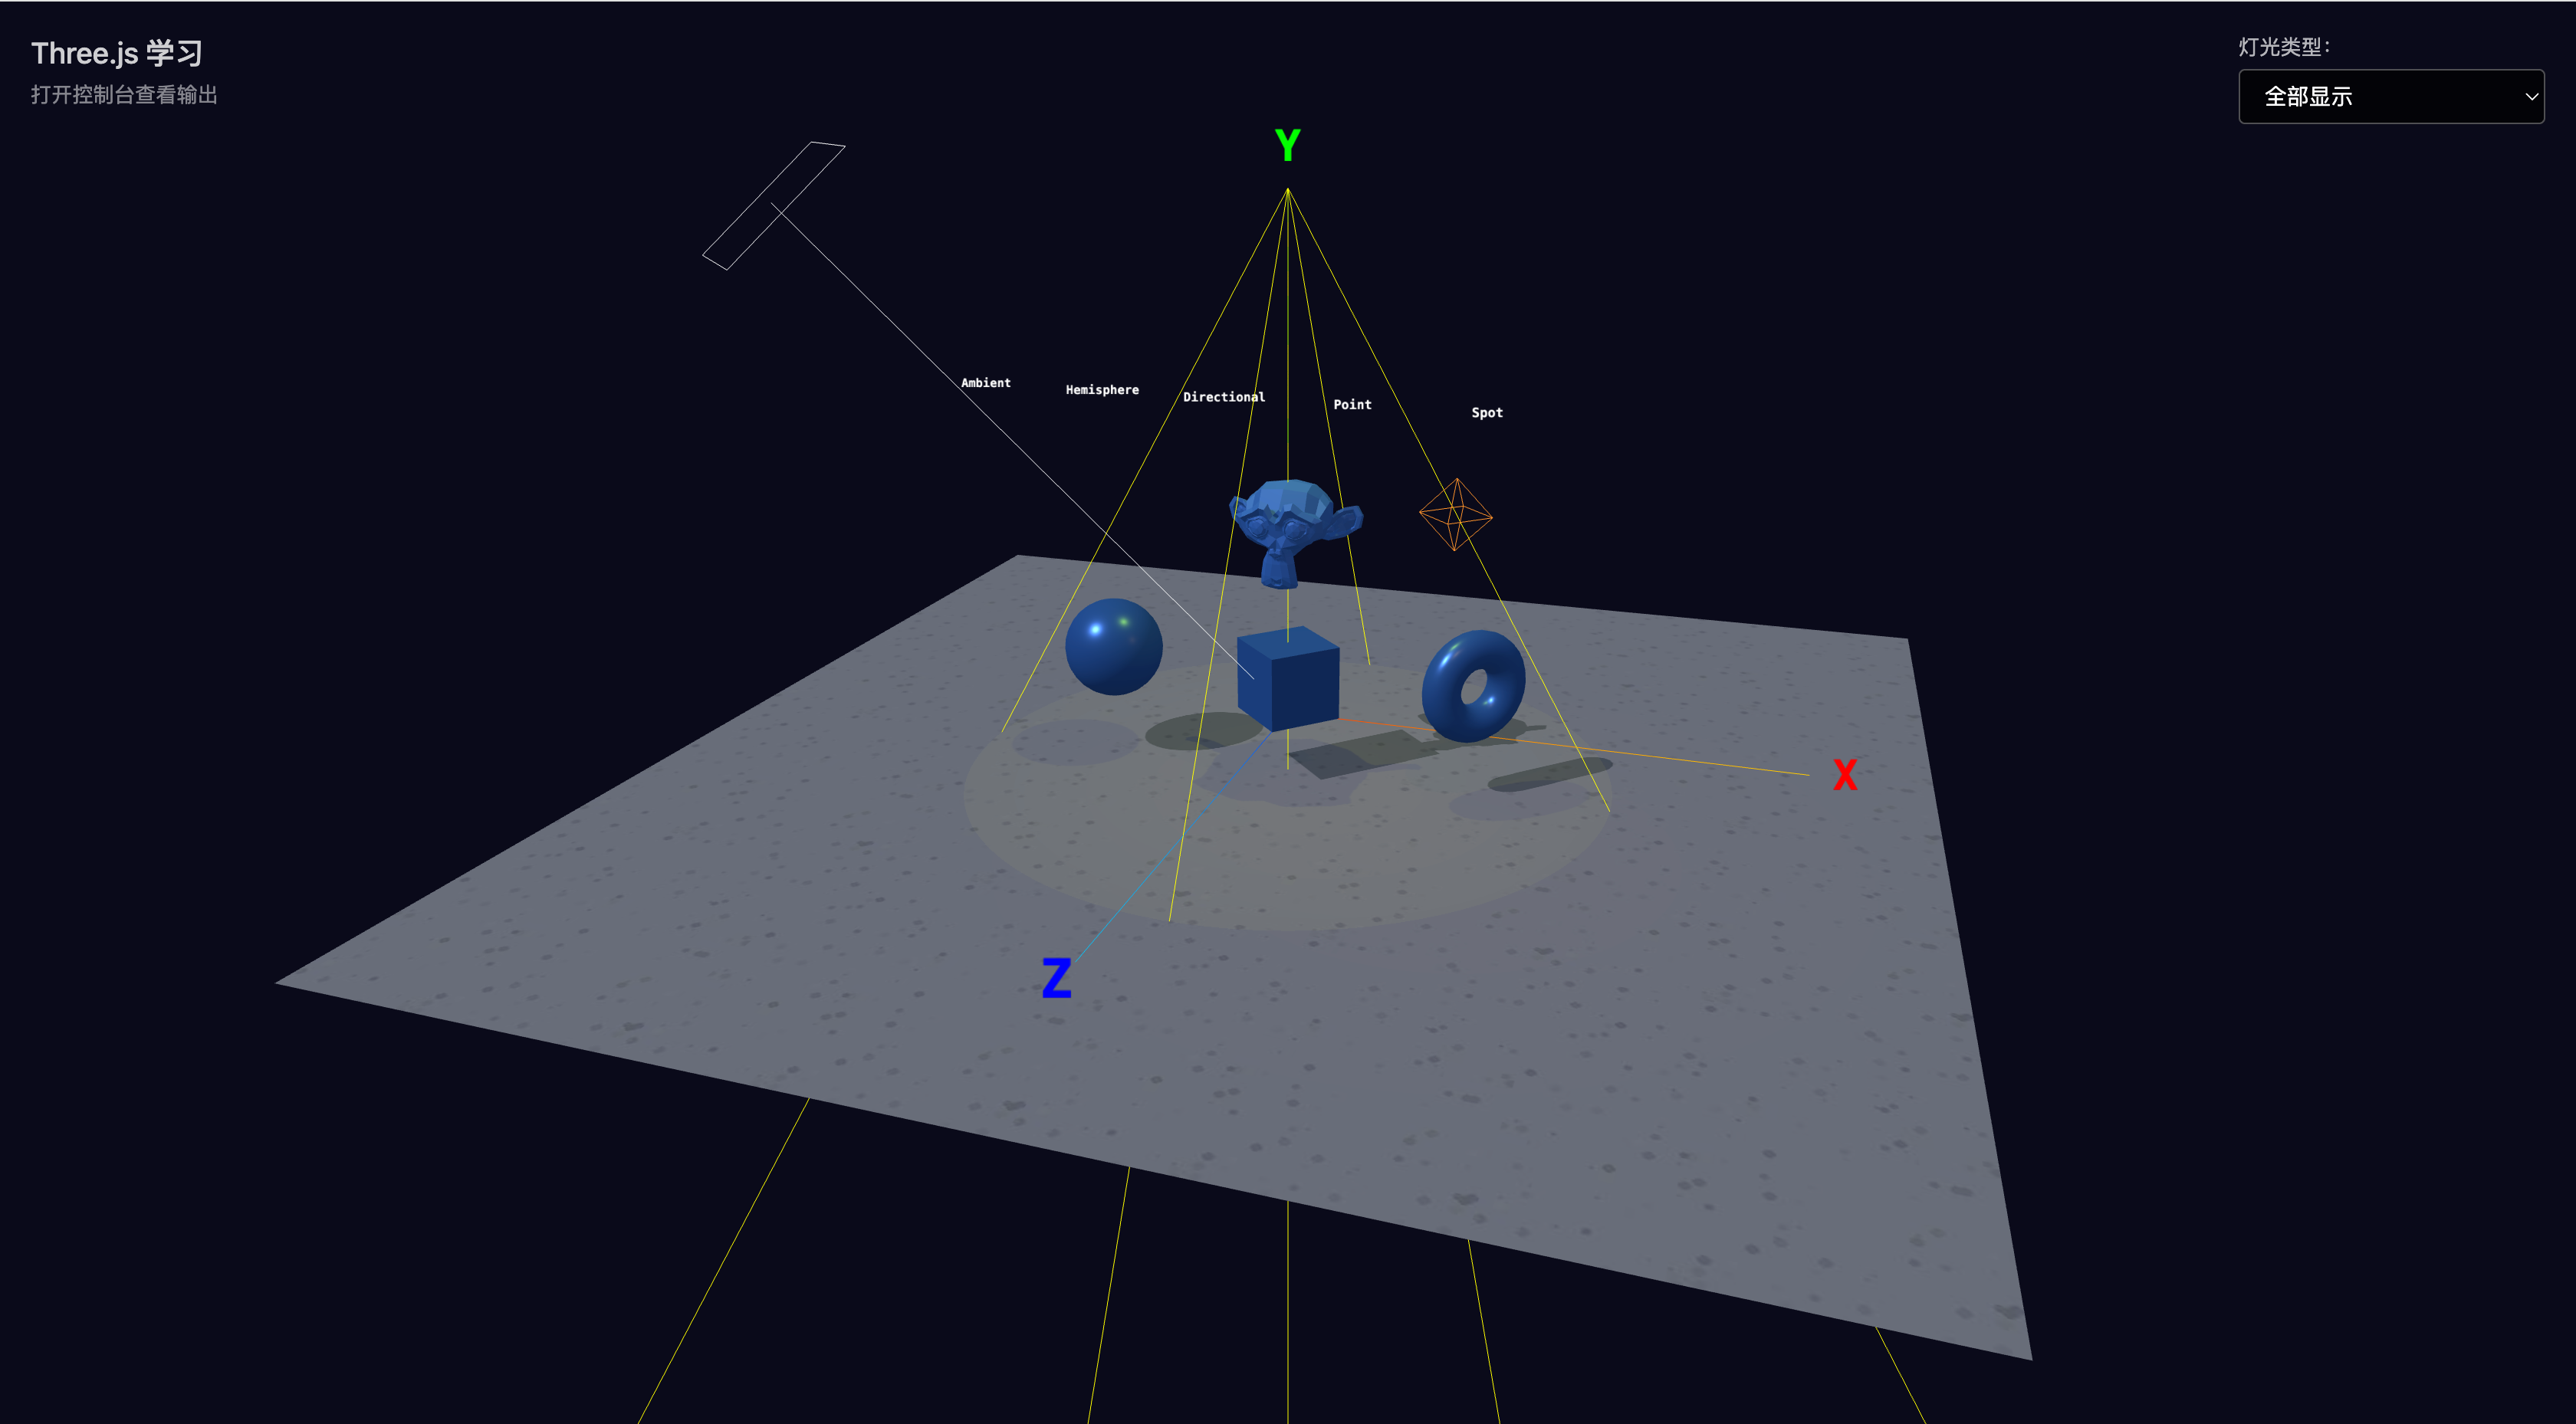
Left to right: Ambient, Hemisphere, Directional, Point, Spot — five light types comparison, with shadow quality showcase at different resolutions below
01 Learning Objectives
This lesson focuses on the Three.js lights and shadows system:
- Master 5 light types and their use cases
- Understand the three elements of shadows (light source, caster, receiver)
- Learn to adjust shadow.mapSize to balance shadow quality and performance
- Learn to use light Helpers for visual debugging
- Understand how shadow.camera range affects shadows
02 Light Types Comparison
Three.js provides multiple light types, each simulating different real-world light sources:
| Light | Purpose | Use Case | Performance |
|---|---|---|---|
| AmbientLight | Uniform global illumination, no direction | Fill ambient light, reduce shadows | Fastest |
| HemisphereLight | Hemisphere lighting (sky + ground) | Outdoor scenes, natural transitions | Fast |
| DirectionalLight | Parallel light, simulates sun | Outdoor scenes, parallel shadows | Medium |
| PointLight | Point light, radiates in all directions | Desk lamps, candles, light bulbs | Medium |
| SpotLight | Spotlight, cone-shaped beam | Flashlights, stage lights | Slow |
/**
 * Helper ambient light: ensures the scene isn't completely dark
 * when using a single light source
 */
const helperAmbientLight = new THREE.AmbientLight(0xffffff, 0.1)

/**
 * 1a. AmbientLight
 *
 * The simplest light: uniformly illuminates all objects globally,
 * no direction, no shadows. Commonly used to fill dark areas.
 *
 * AmbientLight(color, intensity)
 *   color     — Light color, default 0xffffff (white)
 *   intensity — Light intensity, default 1
 */
const ambientLight = new THREE.AmbientLight(0xffffff, 0.3)

/**
 * 1b. HemisphereLight
 *
 * Simulates natural ambient light: sky color + ground color,
 * illuminating from above and below. More nuanced than AmbientLight.
 *
 * HemisphereLight(skyColor, groundColor, intensity)
 *   skyColor    — Color from the sky direction (above)
 *   groundColor — Color from the ground direction (below)
 *   intensity   — Light intensity
 */
const hemisphereLight = new THREE.HemisphereLight(0x87ceeb, 0x362907, 0.4)

/**
 * 1c. DirectionalLight (Parallel Light)
 *
 * Simulates sunlight: all rays are parallel, illuminating the
 * entire scene from one direction. Can cast shadows (orthographic
 * projection — no perspective distortion).
 *
 * Note: position determines light direction (from position toward
 * target, default origin), but distance does NOT affect intensity
 * (unlike PointLight).
 */
const directionalLight = new THREE.DirectionalLight(0xffffff, 1.0)
directionalLight.position.set(-5, 8, 5)

/**
 * 1d. PointLight
 *
 * Emits light in all directions from a single point, like a
 * light bulb or candle. Dimmer with distance (inverse square law).
 * Can cast shadows.
 *
 * PointLight(color, intensity, distance, decay)
 *   distance — Max illumination distance (0 = infinite)
 *   decay    — Falloff type (2 = physically correct)
 */
const pointLight = new THREE.PointLight(0xff922b, 2, 15)
pointLight.position.set(3, 4, 2)

/**
 * 1e. SpotLight
 *
 * Emits light in a cone from a single point, like a flashlight
 * or stage light. Can cast shadows with a cone-shaped falloff.
 *
 * SpotLight(color, intensity, distance, angle, penumbra, decay)
 *   angle    — Cone angle (radians), default Math.PI/3 (60°)
 *   penumbra — Edge softness (0~1), 0 = hard edge, 1 = fully soft
 */
const spotLight = new THREE.SpotLight(0xffff00, 20, 0, Math.PI / 6)
spotLight.position.set(0, 8, 0)
Why do we need a helper ambient light when switching to a single light?
The helper ambient light ensures the scene isn’t completely dark, providing uniform global illumination so dark areas still show object outlines. Without it, a point light only illuminates the front area — the back and distant areas would be pitch black.
03 Three Shadow Elements
Enabling shadows requires three settings, all mandatory:
/**
 * Three steps to enable shadows:
 * 1. renderer.shadowMap.enabled = true — Renderer enables shadows
 * 2. light.castShadow = true — Light casts shadows
 * 3. mesh.castShadow = true — Object casts shadows
 * 4. mesh.receiveShadow = true — Object receives shadows
 *
 * light.castShadow — Whether the light "has the ability" to cast shadows
 * mesh.castShadow — Whether this object "will" block light and cast shadows
 * ground.receiveShadow — Whether this object "can" display shadows cast onto it
 */

// Renderer: enable shadows
renderer.shadowMap.enabled = true

/**
 * shadowMap.type — Shadow map type
 *
 * BasicShadowMap    — Fastest, worst quality (hard edges, aliased)
 * PCFShadowMap      — Medium quality, soft edges but may have aliasing
 * PCFSoftShadowMap  — High quality, soft edges (recommended)
 * VSMShadowMap      — Alternative soft shadows with some limitations
 */
renderer.shadowMap.type = THREE.PCFSoftShadowMap

// Light source: set castShadow = true
directionalLight.castShadow = true

// Caster: set castShadow = true
mesh.castShadow = true

// Receiver: set receiveShadow = true
ground.receiveShadow = true
Debugging order: Renderer → Light → Object → Shadow range → Resolution → Object position
04 Shadow Quality and Performance
shadow.mapSize (Shadow Map Resolution)
| Resolution | Quality | Performance | Use Case |
|---|---|---|---|
| 512×512 | Low | Best | Low-end devices, many shadows |
| 1024×1024 | Medium | Recommended | Most scenes |
| 2048×2048 | High | Slower | Close-up shots |
| 4096×4096 | Ultra | Slowest | Cinematic rendering |
Note: When shadow.mapSize doubles, width and height each double, so total pixels increase by 4×.
directionalLight.shadow.mapSize.width = 1024
directionalLight.shadow.mapSize.height = 1024
shadow.camera (Shadow Camera Range)
The shadow camera determines the range where the light can cast shadows:
/**
 * shadow.camera — Orthographic camera for shadows (defines visible shadow range)
 *   near/far   — Nearest/farthest shadow distance
 *   left/right/top/bottom — Shadow boundary in each direction
 *
 * ⚠️ Important: Objects outside this range will NOT have shadows!
 */
directionalLight.shadow.camera.near = 0.5
directionalLight.shadow.camera.far = 50
directionalLight.shadow.camera.left = -10
directionalLight.shadow.camera.right = 10
directionalLight.shadow.camera.top = 10
directionalLight.shadow.camera.bottom = -10
- Range too large → Shadows become blurry (pixels are stretched)
- Range too small → Shadows get clipped
- Object outside range → No shadow
Key trade-off: Balance coverage range against shadow quality.
05 Shadow Map Types
| Type | Effect | Performance |
|---|---|---|
| BasicShadowMap | Hard edges, aliased | Fastest |
| PCFShadowMap | Medium quality | Medium |
| PCFSoftShadowMap | Soft edges | Slower |
PCFSoftShadowMap samples multiple surrounding pixels and calculates the “percentage in shadow”, creating a gradual transition at shadow edges for a soft, natural look.
06 Light Helpers
Three.js provides light Helpers to visualize light range and direction:
/**
 * DirectionalLightHelper — Visualizes directional light
 * Shows light position and direction (using lines and rectangles)
 * DirectionalLightHelper(light, size) — size: helper line length, default 1
 */
const directionalHelper = new THREE.DirectionalLightHelper(directionalLight, 1)
scene.add(directionalHelper)

/**
 * SpotLightHelper — Visualizes spotlight
 * Shows the cone shape and direction of the spotlight
 */
const spotHelper = new THREE.SpotLightHelper(spotLight)
scene.add(spotHelper)

/**
 * PointLightHelper — Visualizes point light
 * Shows point light position and range (using a sphere)
 * PointLightHelper(light, sphereSize) — sphereSize: helper sphere radius, default 1
 */
const pointHelper = new THREE.PointLightHelper(pointLight, 0.5)
scene.add(pointHelper)
Note: A visible Helper only means the Helper object was added and updated — it does NOT guarantee light parameters are correct. Incorrect effects are usually parameter issues (intensity, color, material) or shadow configuration problems.
07 API Reference
| API | Purpose |
|---|---|
new THREE.AmbientLight(color, intensity) | Ambient light |
new THREE.HemisphereLight(skyColor, groundColor, intensity) | Hemisphere light |
new THREE.DirectionalLight(color, intensity) | Directional light |
new THREE.PointLight(color, intensity, distance) | Point light |
new THREE.SpotLight(color, intensity, distance, angle) | Spotlight |
light.castShadow = true | Light casts shadows |
mesh.castShadow = true | Object casts shadows |
mesh.receiveShadow = true | Object receives shadows |
renderer.shadowMap.enabled = true | Renderer enables shadows |
new THREE.DirectionalLightHelper(light, size) | Directional light Helper |
new THREE.SpotLightHelper(light) | Spotlight Helper |
new THREE.PointLightHelper(light, size) | Point light Helper |
08 Review Quiz
Why do we need a helper ambient light when switching to a single light?
The helper ambient light ensures the scene isn’t completely dark, providing uniform global illumination so dark areas still show object outlines. Without it, a point light only illuminates the front — the back and distant areas would be pitch black.
What are the three shadow elements and the debugging order?
Three elements: light.castShadow (ability to cast), mesh.castShadow (blocks light), ground.receiveShadow (displays shadows). Debugging order: renderer → light → object → shadow range → resolution → object position.
What are the effects and limitations of shadow.mapSize?
Shadow map resolution — larger means clearer but more expensive. Common values: 512 (low), 1024 (medium), 2048 (high), 4096 (ultra). Note: doubling shadow.mapSize doubles both width and height, increasing total pixels by 4×.
Why do we need to traverse and manually add materials after loading Suzanne?
Suzanne is Blender’s built-in test model — when exported as GLB, it only has geometry with no material data. GLTF models may contain multiple Meshes, so traversal is needed to set materials on each one. Otherwise, they display as white or black.
Helper is visible but light effects look wrong — what does this mean?
A visible Helper means light position/direction/range visualization is correct. Wrong effects are usually parameter issues (intensity, color, material) or shadow configuration problems (three elements, range, resolution). Note: a visible Helper only means the Helper object was added and updated — it does NOT guarantee light parameters are correct.
What happens when an object exceeds the shadow.camera range?
Objects outside the range won’t have shadows. Solutions: expand the range, move the object, or move the light. But a range that’s too large causes blurry shadows — you need to balance coverage against quality.
What’s the difference between PCFSoftShadowMap and BasicShadowMap?
BasicShadowMap is fastest but has hard, aliased edges. PCFShadowMap is medium quality. PCFSoftShadowMap produces high-quality soft edges. Note: PCFSoftShadowMap samples multiple surrounding pixels and calculates the “percentage in shadow”, creating gradual edge transitions for a soft look.
09 Plain English Explanation
Light Types
| Light | Plain English |
|---|---|
| Ambient | Ceiling fluorescent light: illuminates the entire room evenly, no direction |
| Hemisphere | Sunny day outdoors: blue light from the sky, brown reflection from the ground |
| Directional | Sunlight: parallel rays, shadows all point the same way |
| Point | Candle/light bulb: radiates light in all directions from one point |
| Spot | Flashlight: cone beam — bright where it hits, dark where it doesn’t |
Three Shadow Elements
Think of a shadow puppet show:
- light.castShadow → The light source (has the ability to cast shadows)
- mesh.castShadow → The puppet (blocks the light)
- ground.receiveShadow → The screen (displays the shadow)
All three are essential. No light, no shadow. No puppet, nothing to block the light. No screen, nowhere for the shadow to appear.
shadow.camera Range
The shadow camera is like the “picture frame” for shadow casting:
- Frame too small → Image gets clipped, parts outside have no shadow
- Frame too large → Image gets stretched, shadows become blurry
- Just right → Shadows are clear and complete
shadow.mapSize
Like photo resolution:
- 512×512 → Blurry phone photo
- 1024×1024 → Normal phone photo
- 2048×2048 → DSLR high-res photo
- 4096×4096 → Cinematic 4K quality
Higher resolution = clearer, but also more memory and slower.
This is the 4th note in the Three.js + GLSL + WebGPU learning series. Course rating: 9.5/10.